NoLoAD Environment Setup Guide
Overview
This guide offers step-by-step instructions for configuring NoLoAD (NoMAD Login AD) on macOS, enabling users to log in with their Domain Accounts without binding the system directly to a specific Domain. NoLoAD provides a streamlined solution for seamless domain authentication on Mac devices.
APU Network Specific Configuration
This guide and configuration are specifically designed for use on Asia Pacific University (APU)’s Network. The included configuration files, DNS settings, and domain references are all configured for APU’s technical infrastructure. If you’re setting up NoLoAD elsewhere, you’ll need a different configuration.
NoLoAD is ideal for educational and enterprise settings where centralized user management is needed. It enables domain logins on Macs, which cannot fully join Active Directory domains similar to Windows devices.
Prerequisites
- A Mac computer running macOS 10.12 (Sierra) or newer
- A working internet connection
- Access to the institution’s network (either via WiFi or Ethernet connection)
- Basic familiarity with macOS
Some steps in this installation may require administrator privileges on the Mac. If you don’t have admin access, please contact your fellow TAs for assistance.
Contents
- NoLoAD Environment Setup Guide
Installation Steps
Step 0: Ensure the Device Can Connect to the Domain Controller
Before installing NoLoAD, verify that your Mac can connect to the domain network. NoLoAD requires proper connectivity to function.
- Check Network Connection
- Ensure your Mac is connected to the “IOT@APU” WiFi network or via Ethernet (LAN).
- To verify WiFi: Click the WiFi icon in the menu bar and confirm “IOT@APU” is selected.
- For Ethernet: Confirm the cable is securely connected to both the Mac and the network port.
- Verify Domain Controller Connectivity
- Open Terminal (Applications > Utilities > Terminal, or use ⌘+Space and search for “Terminal”).
- Run:
nslookup techlab.apiit.edu.my - If the domain is resolving correctly, you should see its corresponding IP address in the output.
- If Domain Resolution Fails:
- Go to System Preferences (or System Settings in newer macOS versions)
- Navigate to Network
- Select your active interface (WiFi or Ethernet)
- Click Advanced…, go to the DNS tab
- Add the DNS server:
10.61.20.33 - Click OK > Apply
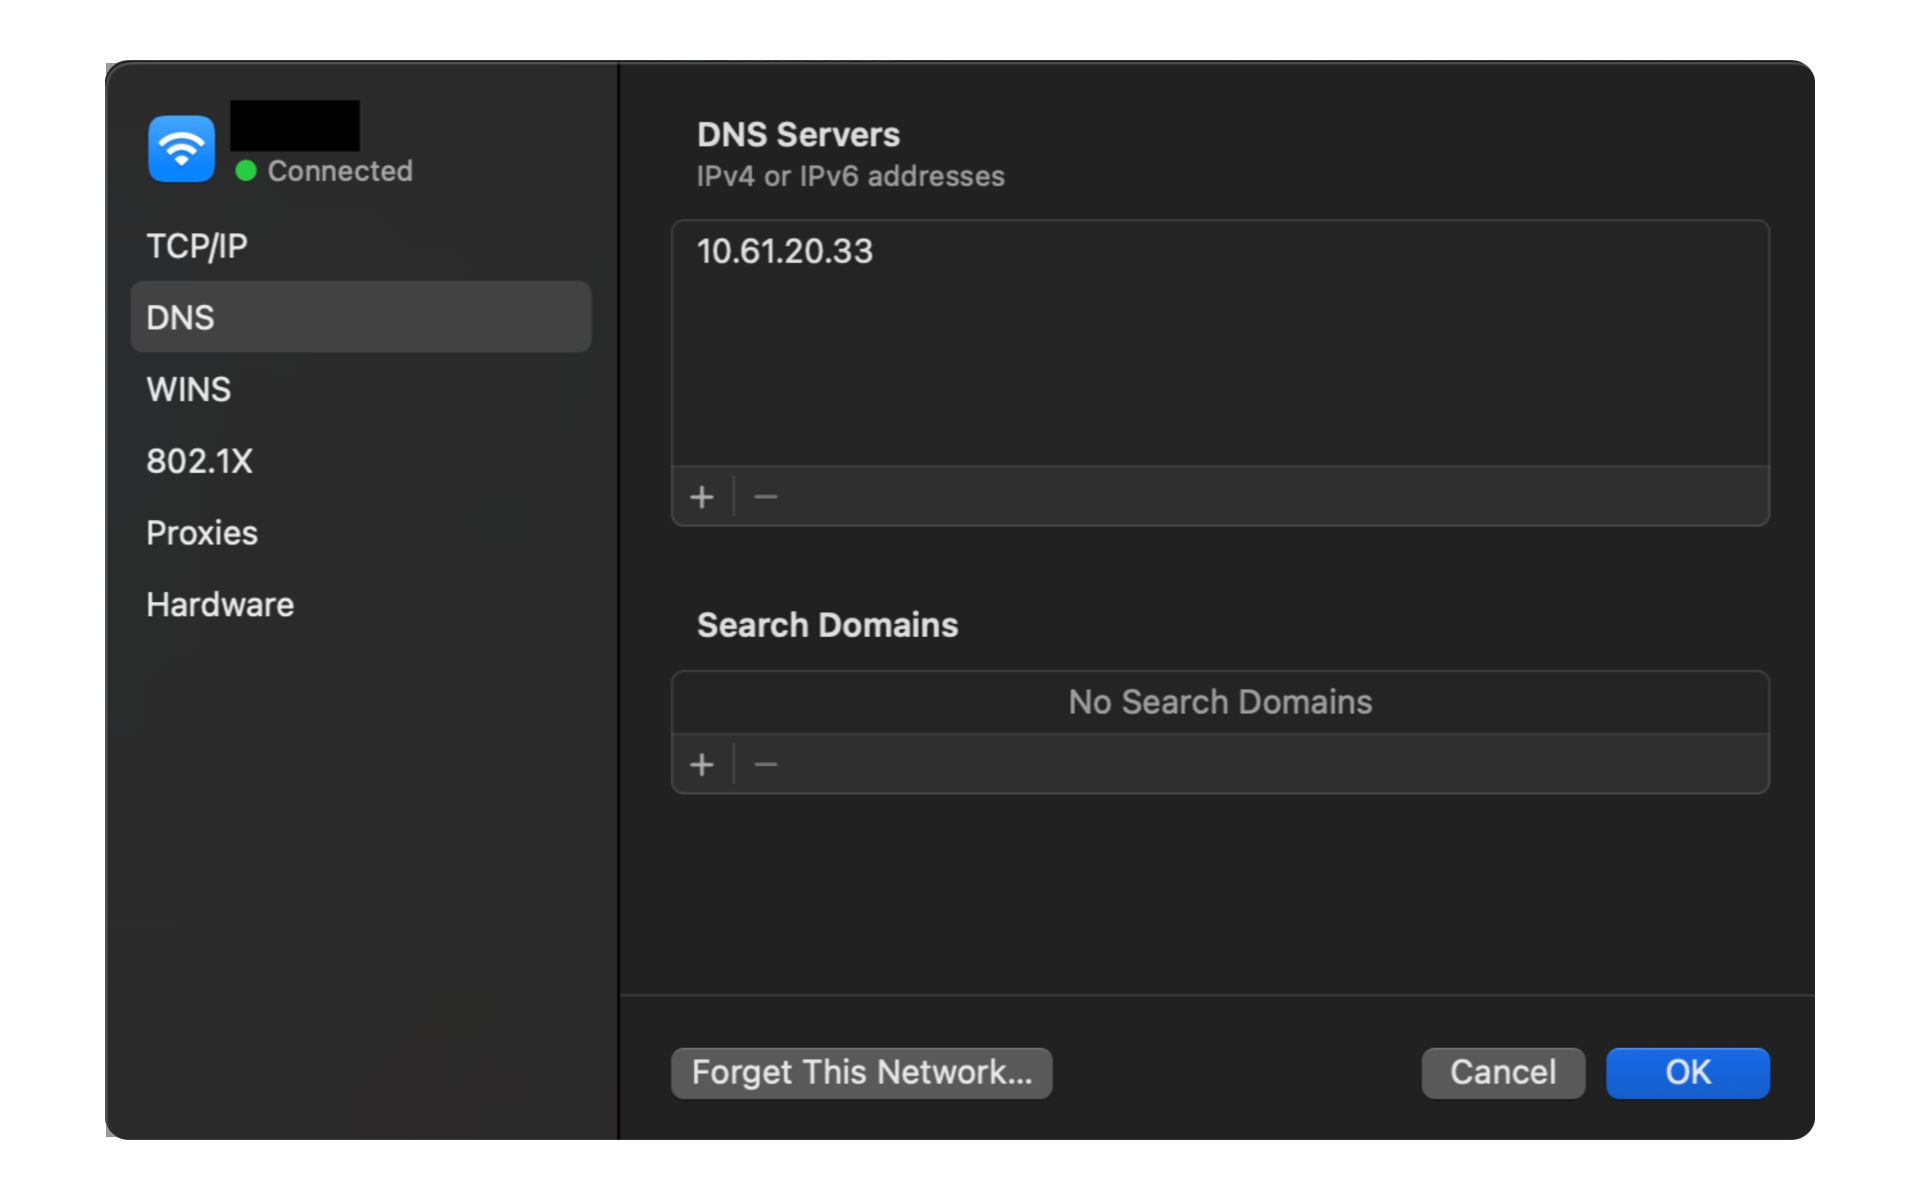 Fig 1: Adding APU's DNS server in macOS Network settings
Incorrect DNS settings will prevent your Mac from locating the domain controller, causing NoLoAD setup to fail.
Step 1: Download and Install NoLoAD
If you’re using system restore solutions like Deep Freeze or similar, you must temporarily disable them before installing NoLoAD or making any configuration changes. Once setup is complete and verified, you may re-enable the restore protection. Failure to do so may cause configuration loss after a reboot.
-
Download the Installer
Download NoLoAD (NoMAD-Login-AD.pkg) from the shared OneDrive folder and save it (typically in the Downloads folder). -
Run the Installer
- Open Finder, go to Downloads, and double-click
NoMAD-Login-AD.pkg. - If you see a security warning:
- Right-click the file > Open > confirm with Open.
- Follow the installation prompts:
- Click Continue through the steps.
- Choose your main drive and click Install.
- Enter your admin password when prompted.
- Open Finder, go to Downloads, and double-click
Installation may take a few minutes. Avoid interrupting the process.
Step 2: Install the Configuration Profile
-
Download the Configuration File
Download.mobileconfigfile from the shared OneDrive folder -
Install the Profile
- Locate the file in Downloads and double-click it.
- System Preferences (or System Settings) will open to Profiles.
- Click Install, authenticate if prompted, and confirm any warnings.
If installation doesn’t start automatically, go to System Preferences > Profiles (or Settings > Privacy & Security > Profiles), click +, and add the downloaded file manually.
Step 3: Set Up the Lockscreen Assets
-
Download Assets
Download lockscreen ZIP from the shared OneDrive folder - Extract the ZIP
- Double-click the file in Downloads to extract the
LoginScreenfolder.
- Double-click the file in Downloads to extract the
- Copy Assets to System Folder
- Open Terminal, then run:
sudo mkdir -p /Library/LoginScreen
sudo cp -r ~/Downloads/LoginScreen/* /Library/LoginScreen/
- Open Terminal, then run:
- Set Correct Permissions
- In Terminal:
sudo chmod -R 755 /Library/LoginScreen
Alternatively via Finder:
- Press ⌘+Shift+G in Finder, type
/Library, and click Go. - Right-click
LoginScreen> Get Info - Click the lock icon, enter your password, and set permissions to Read & Write for all users.
- Click the gear icon > Apply to enclosed items
- In Terminal:
Improper permissions may prevent the login screen from displaying correctly.
Post Setup Steps
Verify Installation
- Save any open work and log out of your current user account:
- Click the Apple menu (top left corner) and select “Log Out [Username]”
- Or use the keyboard shortcut ⌘+Shift+Q
-
At the login screen, you should now see the customized NoLoAD login interface instead of the standard macOS login screen.
- To test domain authentication:
- Enter your domain username in one of the following formats:
- username@techlab.apiit.edu.my
- or simply username (the domain has already been configured in the configuration file)
- Enter your domain password
- Click the “Log In” button or press Return
- Enter your domain username in one of the following formats:
Domain accounts logged into the Mac will remain stored locally on the machine, even after logout—just like on Windows. These accounts will persist until manually deleted.
Troubleshooting
If the custom login screen doesn’t appear or domain authentication fails:
- Restart your Mac to ensure all changes take effect
- Verify your network connection and DNS settings
- Check that the NoLoAD service is running by opening Terminal and typing:
sudo launchctl list | grep NoMAD- If issues persist, you might need to reinstall the NoLoAD package
Managing Domain User Profiles
Over time, a Mac with NoLoAD may accumulate multiple domain user profiles. For maintenance or troubleshooting purposes, you may need to remove these profiles.
Both methods permanently remove user accounts and their associated data from the Mac. Ensure any important files are backed up before proceeding.
Automated Removal Method
- Download the Removal Script
- Download the
remove_ad_users.shscript from the shared OneDrive folder
- Download the
- Run the Script to Remove Domain Users
- Open Terminal (Applications > Utilities > Terminal)
- Navigate to your Downloads folder:
cd ~/Downloads - Make the script executable:
chmod +x remove_ad_users.sh -
Run the script with admin privileges in one of two modes:
Dry Run Mode (safely preview changes without making them):
sudo ./remove_ad_users.sh --dry-runNormal Mode (actually remove users):
sudo ./remove_ad_users.sh - The script will:
- Scan and identify all Active Directory (AD) users on the Mac
- Display a list of all found AD users with their account names
- Ask for confirmation before proceeding
- If confirmed, remove all AD user accounts and associated data:
- User account entries
- Home directories
- System preference files
- Application caches
- Temporary files
- Various user-related data throughout the system
Manual Removal Method
If you prefer to remove domain users manually:
- Open System Preferences/Settings
- Click the Apple menu (top left) and select “System Preferences” (or “System Settings” in newer macOS)
- Navigate to “Users & Groups”
- Unlock the Preference Pane
- Click the lock icon in the bottom left corner
- Enter your administrator credentials when prompted
- Remove Domain User Accounts
- Select the domain user account you wish to remove from the list on the left
- Click the minus (-) button below the list
- In the dialog that appears, choose one of the options:
- In the dialog that appears, choose one of the options:
- “Delete the home folder” (removes all user data, recommended)
- “Save the home folder in a disk image” (preserves data)
- “Don’t change the home folder” (leaves data intact)
- Click “Delete User”
- Repeat as Needed
- Follow the same process for each domain user account you want to remove
Removing user profiles periodically on lab computers helps maintain system hygiene and free up disk space.
Uninstallation (If Needed)
If you need to uninstall NoLoAD for any reason:
- Download the uninstall script from the shared OneDrive folder
- Open Terminal (Applications > Utilities > Terminal)
- Navigate to where you downloaded the script:
cd ~/Downloads - Make the script executable and run it:
chmod +x Uninstall-NoLoAD.sh sudo ./Uninstall-NoLoAD.sh - Restart your Mac after the uninstallation completes
Uninstalling NoLoAD will revert your Mac to the standard login system. Domain users may no longer be able to log in without additional configuration